The Dream Terminal on Apple: A Setup Guide for Ghostty, tmux, and oh-my-zsh
If you spend more time in the terminal than in your browser, the standard macOS tools quickly become insufficient. On the Apple M1 with its Darwin_arm64 architecture, we have colossal performance at our disposal, and it would be a sin not to use it to build the perfect, lightning-fast, and comfortable workspace.
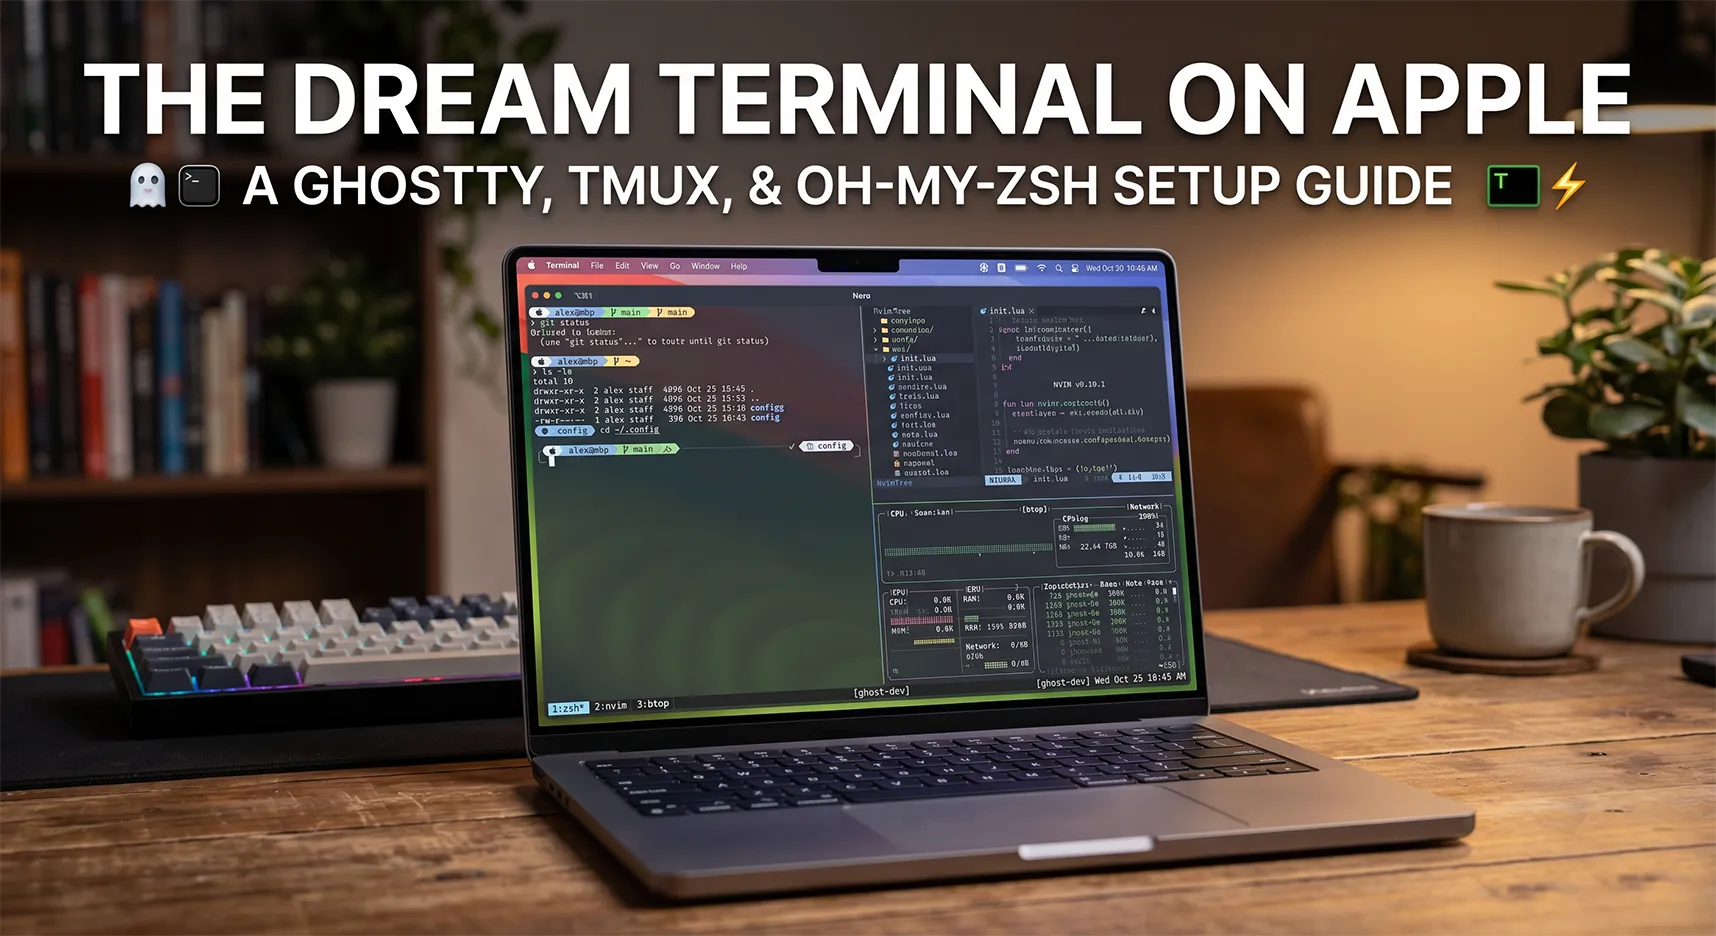
Today, we're going to break down my setup: Ghostty + tmux + oh-my-zsh.
Why do you need these tools and what is the profit?
Ghostty: A modern, incredibly fast terminal emulator rendered on the GPU. It responds to input instantly, supports modern standards, and doesn't hog memory like Electron-based apps. The profit — zero latency and pleasing minimalism.
Oh My Zsh: A framework for managing your Zsh configuration. The profit — instead of writing hundreds of lines of code for autocompletion, syntax highlighting, or a beautiful prompt, you just plug in ready-made plugins. This makes working in the console visually clear and fast.
Tmux: A terminal multiplexer. It allows you to split one window into multiple panes and tabs. But the main profit is sessions. You can close Ghostty, reboot your graphical interface, then open the terminal, type
tmux attach— and all your running servers, open Neovim files, and logs will remain exactly where you left them. (We will talk about the nuances of compiling its plugins for the M1 chip in the upcoming parts).
Let's start with the basic foundation — setting up Zsh.
Step 1: Install Homebrew
Homebrew is a package manager for macOS. You can't get far without it. Open your terminal and run this command:
Bash
/bin/bash -c "$(curl -fsSL https://raw.githubusercontent.com/Homebrew/install/HEAD/install.sh)"
After installation, you need to add it to your PATH variable (replace [username] with your actual username, e.g., muntai):
Bash
echo 'eval "$(/opt/homebrew/bin/brew shellenv)"' >> /Users/[username]/.zprofile
eval "$(/opt/homebrew/bin/brew shellenv)"
Step 2: Install Git
If you don't have Git installed yet, add it via Brew:
Bash
brew install git
Step 3: Install Oh My Zsh
Run the official installation script. It will automatically make Zsh your default shell:
Bash
sh -c "$(curl -fsSL https://raw.githubusercontent.com/ohmyzsh/ohmyzsh/master/tools/install.sh)"
Step 4: PowerLevel10K Theme and Fonts
PowerLevel10K is the fastest and most informative theme for Zsh. Let's install it:
Bash
git clone https://github.com/romkatv/powerlevel10k.git $ZSH_CUSTOM/themes/powerlevel10k
Important: For icons (git branches, directory logos) to display correctly, you need the Meslo Nerd Font. Usually, during the first launch of PowerLevel10K, it will prompt you to download it — just press
y, wait for the installation, and restart Ghostty.
After restarting the terminal, type p10k configure and go through the simple wizard, choosing the prompt style you like best.
Step 5: Install Plugins
To make the terminal suggest commands from your history and highlight syntax correctly (green for valid commands, red for errors), let's install two must-have plugins:
Bash
# Autocompletion
git clone https://github.com/zsh-users/zsh-autosuggestions ${ZSH_CUSTOM:-~/.oh-my-zsh/custom}/plugins/zsh-autosuggestions

# Syntax Highlighting
git clone https://github.com/zsh-users/zsh-syntax-highlighting.git ${ZSH_CUSTOM:-~/.oh-my-zsh/custom}/plugins/zsh-syntax-highlighting
Step 6: The Perfect .zshrc Config
Now let's put it all together. Open the ~/.zshrc file in your favorite editor (like Neovim) and completely replace its contents with this optimized config.
This already includes the correct paths for Apple Silicon (/opt/homebrew/bin), hooked-up plugins, and modern utilities like eza (an ls replacement), zoxide (a smarter cd), and atuin (advanced command history).
Bash
# 1. Powerlevel10k Instant Prompt
if [[ -r "${XDG_CACHE_HOME:-$HOME/.cache}/p10k-instant-prompt-${(%):-%n}.zsh" ]]; then
  source "${XDG_CACHE_HOME:-$HOME/.cache}/p10k-instant-prompt-${(%):-%n}.zsh"
fi

# 2. Oh My Zsh Config
export ZSH="$HOME/.oh-my-zsh"
ZSH_THEME="powerlevel10k/powerlevel10k"

# Plugins
plugins=(git zsh-autosuggestions zsh-syntax-highlighting copypath web-search)
source $ZSH/oh-my-zsh.sh

# 3. Environment Variables and Paths (Optimized)
export TERM=xterm-256color
export COLORTERM=truecolor
export NVM_DIR="$HOME/.nvm"
[ -s "$NVM_DIR/nvm.sh" ] && \. "$NVM_DIR/nvm.sh"

# CRITICAL BLOCK: Put Homebrew first so all utilities (tree-sitter, etc.) are found immediately
export PATH="/opt/homebrew/bin:/opt/homebrew/sbin:$PATH"

# Other paths
export PATH="/opt/homebrew/opt/postgresql@18/bin:$PATH"
export PATH="/opt/homebrew/opt/ruby/bin:$PATH"
export PATH="/opt/local/bin:$PATH"
export PATH="$HOME/.lmstudio/bin:$PATH"
export PATH="$HOME/.local/bin:$PATH"

# pnpm
export PNPM_HOME="/Users/muntai/Library/pnpm"
export PATH="$PNPM_HOME:$PATH"

# 4. Aliases
alias vim="nvim"
alias reload-zsh="source ~/.zshrc"
alias edit-zsh="nvim ~/.zshrc"
alias python="python3"
alias pip="pip3"

# --- Improved aliases for eza (ls/ll/la replacement) ---
alias ls="eza --icons=always --group-directories-first"
alias ll="eza -l --icons=always --group-directories-first --git"
alias la="eza -la --icons=always --group-directories-first --git"
alias lt="eza -T -L 3 --icons=always --group-directories-first"

alias lzd="lazydocker"

# 5. Functions
# Yazi (file manager)
function y() {
	local tmp="$(mktemp -t "yazi-cwd.XXXXXX")" cwd
	yazi "$@" --cwd-file="$tmp"
	if cwd="$(command cat -- "$tmp")" && [ -n "$cwd" ] && [ "$cwd" != "$PWD" ]; then
		builtin cd -- "$cwd"
	fi
	rm -f -- "$tmp"
}

# 6. Command History
HISTFILE=$HOME/.zhistory
SAVEHIST=1000
HISTSIZE=999
setopt share_history
setopt hist_expire_dups_first
setopt hist_ignore_dups
setopt hist_verify

# 7. Integrations (Atuin, Zoxide)
# Atuin
[ -s "$HOME/.atuin/bin/env" ] && \. "$HOME/.atuin/bin/env"
eval "$(atuin init zsh)"

# Zoxide
eval "$(zoxide init zsh)"

# 8. Final theme initialization
[[ ! -f ~/.p10k.zsh ]] || source ~/.p10k.zsh
After saving the file, run the command source ~/.zshrc.
Step 7: Ghostty Configuration (Aesthetics and Speed)
Now let's move on to the very heart of our terminal — the Ghostty configuration file. Since it's a native app, we can squeeze the maximum visual pleasure and convenience out of it.
Open your config (usually ~/.config/ghostty/config) and add the following settings:
1. Fonts and Text Handling
Ghostty has incredible font rendering. For TypeScript and Next.js development, JetBrains Mono is a perfect fit.
font-family = "JetBrainsMono Nerd Font"andfont-size = 13.5: Sets the base font with icon support (Nerd Font).font-thicken = true: Makes the fonts slightly more "Mac-like" and smooth.copy-on-select = true: Saves a ton of time — just highlight text, and it's already in your system clipboard.link-url = true: Makes URL links clickable (viaCmd+ click).macos-option-as-alt = true: Allows using theOptionkey asAlt, which is crucial for terminal keybinds.
2. Theme and Colors
theme = "Catppuccin Mocha": Ghostty has hundreds of built-in themes, but we are choosing Catppuccin. It perfectly harmonizes with our future tmux and Neovim settings, creating a unified visual style for your entire workspace.
3. Window Aesthetics (macOS Style)
The terminal should look modern, not like a window from the 90s.
background-opacity = 0.95andbackground-blur-radius = 20: These create that premium "frosted glass" (blur) effect that looks luxurious on Mac screens.window-padding-x = 10andwindow-padding-y = 10: Adds inner padding. Your code no longer sticks to the edges of the window; it has room to "breathe."
4. Cursor and Mouse
cursor-style = blockandcursor-style-blink = false: We set a classic block cursor and disable blinking. This is absolutely non-distracting during thoughtful code or log reading.cursor-click-to-move = true: Ensures smooth cursor animation when switching contexts.mouse-hide-while-typing = true: As soon as you start typing code, the mouse cursor disappears so it doesn't block the text. A small but very thoughtful detail.
5. Behavior and Keybinds
Ghostty allows for very flexible keybind configurations.
window-save-state = always: The terminal remembers the size and position of the window on the screen when closed.confirm-close-surface = false: Disables the annoying confirmation when closing a window (we are backed up against accidental data loss by tmux sessions anyway).
Keybinds for quick navigation:
keybind = cmd+t=new_tab— instantly create a new tab.keybind = cmd+w=close_surface— quickly close the active tab.keybind = cmd+shift+h=previous_tabandkeybind = cmd+shift+l=next_tab— switch between tabs Vim-style (using thehandlkeys).keybind = cmd+k=clear_screen— quickly clear the screen. A lifesaver when Next.js compiler output gets too long.
config.ghosty:
# ===============================================
# Fonts and Text
# ==============================================
# Ghostty renders fonts incredibly well. JetBrains Mono is the best for Next.js and TypeScript.
font-family = "JetBrainsMono Nerd Font"
font-size = 13.5
# Makes fonts a bit more Mac-like and smooth
font-thicken = true

# Automatically copies selected text to the system clipboard
copy-on-select = true

# Allows Ghostty to correctly handle URL links (you can click them with Cmd)
link-url = true

# Disables the annoying system error sound
macos-option-as-alt = true

# ==================================================
# Theme and Colors
# ====================================================
# Ghostty has hundreds of built-in themes. We'll use the same one as in your tmux for perfect harmony!
theme = "Catppuccin Mocha"

# ===============================================
# Window Appearance (macOS Aesthetics)
# =================================================
# Remove the standard top frame with the window title. Only the closing "traffic lights" will remain. # macos-titlebar-style = hidden
# Add slight translucency
background-opacity = 0.95
# Add a "frosted glass" effect (blur, only works on macOS)
background-blur-radius = 20

# Inner padding to prevent text from sticking to the window edges
window-padding-x = 10
window-padding-y = 10

# ==================================================
# Cursor and Mouse
# ======================================================
# Classic block cursor, doesn't blink (not distracting when reading code)
cursor-style = block
cursor-style-blink = false
# Smooth cursor animation when switching
cursor-click-to-move = true
# Hide the mouse cursor when you start typing
mouse-hide-while-typing = true

# ===============================================
# Behavior
# ================================================
# Remember window size and position when closing
window-save-state = always
# Confirm when closing a window (to avoid accidentally killing your session, although tmux will save you)
confirm-close-surface = false

# Quickly switch to creating a new tab
keybind = cmd+t=new_tab

# Quickly close
keybind = cmd+w=close_surface

# Switch between tabs
keybind = cmd+shift+h=previous_tab
keybind = cmd+shift+l=next_tab

# Quickly clear logs in the current terminal
keybind = cmd+k=clear_screen
Коментарі (0)
Leave a comment